How to plan a long-term backpacking travel through South America
Planning a long-term backpacking trip in South America? Get real tips on routes, safety, budget & packing from 6 months across 8 countries.
Sasha Hjort
7/22/202510 min read
How to plan a long-term backpacking travel through South America
Planning a long-term backpacking trip in South America? Get real tips on routes, safety, budget & packing from 6 months across 8 countries.
24/8/2025 • 5 min read
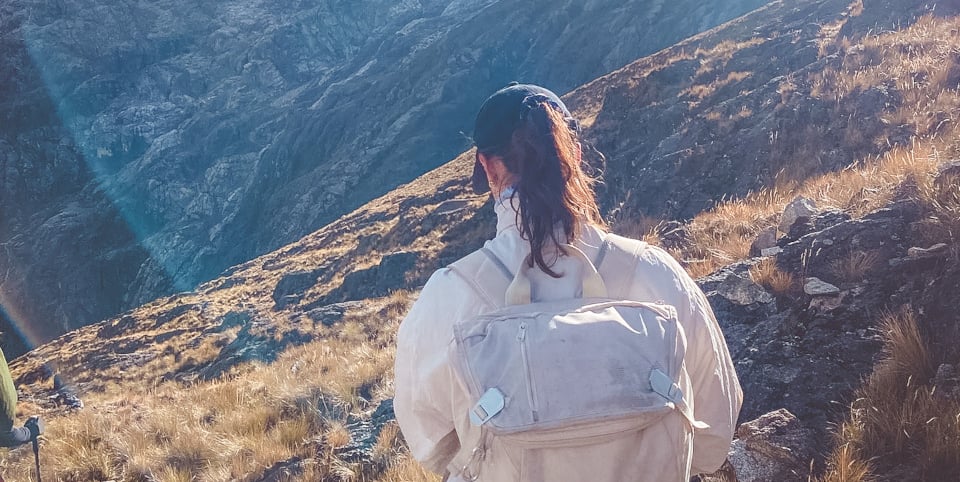
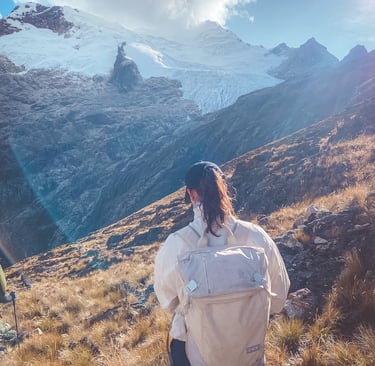
On the way to Laguna 69 in Peru
So, you’re thinking about backpacking Aouth America?
When my friend and I landed in Quito in September 2023, we had a rough route, a few bookings, and a lot of curiosity. One week in, we let go of the itinerary and started following what felt right — something that didn’t come naturally to us, but ended up shaping the entire journey. Six months later, we’d crossed eight countries, hiked to glaciers, eaten guinea pig burgers, gotten robbed (twice), and somehow still weren’t ready to go home.
This guide is for you if you’re dreaming of a long-term trip through South America but aren’t sure where to begin. It’s honest, practical, and based on real experiences — the good, the bad, and the unexpected.
Table of Contents
Click on the topic of interest for faster navigation:
Step 1: Choose your route (and stay flexible)
You Won’t See It All — And That’s the Point
South America is massive. From Andean peaks to Amazon jungle, colonial towns to chaotic megacities — it’s a continent of contrasts. The biggest mistake you can make is trying to see everything. The truth? What you do manage to explore will be more than enough.
We began our journey in Quito, Ecuador, and gradually made our way south through Peru, Bolivia, Chile, Brazil, and Argentina, eventually looping back up to Colombia. After five months together, we split up — and I continued solo for one more month between Argentina and Uruguay. It wasn't a straight line, and it didn't need to be. What mattered was that it flowed.
Build Your Route Around the Seasons (and Your Must-Sees)
There’s no perfect itinerary — but there are smart ways to structure your route. Most travelers move north to south or vice versa, depending on the time of year. Here are a few region-specific tips that can shape your decision:
Patagonia: Best from December to February — it’s summer, and most trails are accessible.
Amazon Jungle: Hot and humid all year, but drier months (June–October) are generally more comfortable.
Andes Altitude (Peru/Bolivia): You’ll need time to acclimate — plan to take it slow and ascend gradually.
Brazil’s Coastline: Ideal between April and October, when it’s drier and slightly cooler.
How to Choose Where to Go (When You Want to Go Everywhere)
Instead of mapping out every city in advance, try to built a flexible route based on:
A few key places we knew we wanted to visit
The seasons — and avoiding extreme weather
The cost and visa requirements of each country
The overland routes that made sense logistically
We left enough room to say yes to places we hadn’t planned on (like a week in Jericoacoara, Brazil), and we skipped others when we felt burned out. That freedom was invaluable.
Step 2: Budgeting for a long-term travel
The objective is: Set your travel framework - even if plans changes
When you're planning a long-term trip, like six months in South America, one of the biggest questions is: How much will it cost? And the honest answer is: you won’t know exactly — but you can create a solid structure that lets you move with flexibility without blowing your budget halfway through.
Start by asking yourself the big picture questions:
How much money do I have saved?
What’s my absolute maximum budget?
How long do I realistically want to travel?
Are there destinations or experiences I know I want to include?
Those answers will shape your travel style and route. For us, the original plan was three months of travel, mostly overland by bus. Nothing fancy. But then we found the cheapest one-way flight from Denmark to South America — which happened to be to Quito, Ecuador — and that became our starting point. Just like that, the continent began unfolding from north to south.
Estimating Costs: Start with Research, Not Guesswork
We started with basic research using Numbeo to look up cost-of-living data for Ecuador, Peru, and other potential countries. Based on that, we estimated a monthly travel budget of 10,000 DKK (~$1,570 USD) per person — including everything from accommodation to food to a return flight home.
But we didn’t stick to that budget religiously. We actually had more saved up, but treated that extra as a buffer, not part of our main funds. That mindset was key. It gave us the freedom to say yes to opportunities but also helped keep our everyday choices grounded.
Budgeting Is About Boundaries, Not Limitations
Even with a loose plan, we didn’t expect what actually happened: it was cheaper than we thought. So we just kept going. Instead of flying home for Christmas, we decided to extend the trip and ride the budget until it ran out naturally.
The takeaway? Budgeting isn’t about controlling every coin — it’s about setting up personal boundaries so you don’t drain your funds in two weeks. That’s especially important in countries where everything feels inexpensive compared to back home (for us, Denmark).
How We Traveled Without Feeling Deprived
We weren’t luxury travelers, but we didn’t rough it either. We:
Booked private hostel rooms instead of dorms.
Cooked when we could, but went out when it felt worth it.
Took long-distance buses across borders — but said yes to flights when time or comfort made it worthwhile.
Occasionally splurged on experiences we knew we’d remember.
Tracking Every Peso, Sol, and Real
We tracked all our expenses using TripCoin — a simple travel budget app (unfortunately, only available for iOS). Every meal, bus ticket, SIM card, and jungle tour went into that app. It made it easy to see where the money was going, and helped us tweak things along the way.
Daily budget by country:
Our average daily spend per person:
330 DKK / €44 / $48 USD
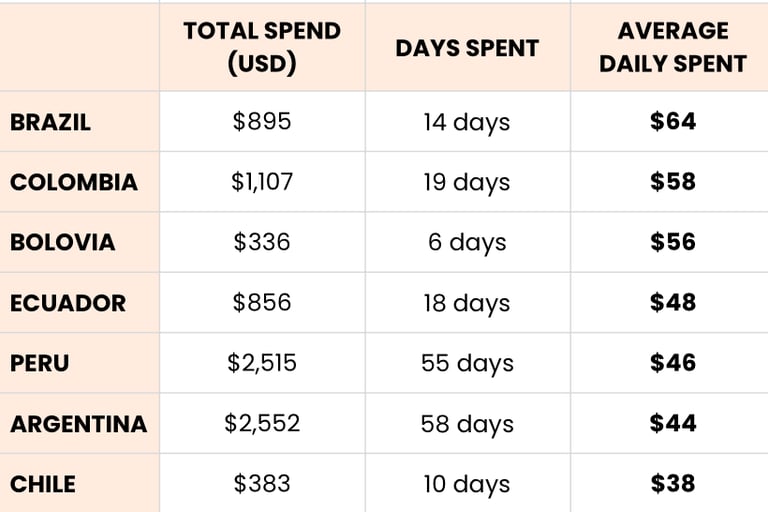
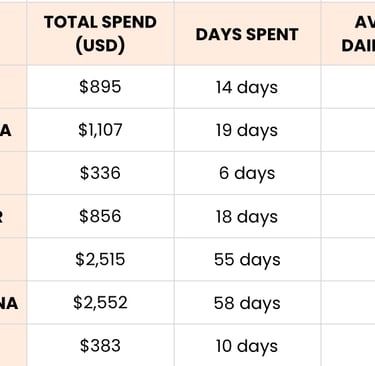
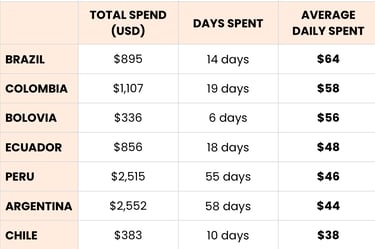
Note: We spent fewer days in Chile — it was more of a transit stop for us, and we chose to save our budget for other experiences. Uruguay isn’t included here, as I didn’t track expenses during that part of the trip. But I can tell you this: it’s one of the pricier countries, on par with Brazil and Chile.
Final Thoughts on Budgeting for a Big Trip
You can’t plan for everything, and that’s part of the adventure. But if you give yourself some clear financial boundaries— a monthly cap, a splurge fund, and a backup stash — you’re setting yourself up for a trip that’s both sustainable and satisfying.
And when the continent surprises you (because it will), you’ll be ready to say yes to the unexpected — without panicking over money.
Step 3: What to pack (and what to leave behind)
Backpacking through South America means bouncing between steamy jungles, chilly mountains, beach towns, and chaotic cities. It’s tempting to overpack — but the real trick is to pack light and clever.
Your backpack will be your home, your closet, and your suitcase all in one. What you bring should be versatile, durable, and something you actually like wearing.
I traveled with a 40L carry-on-sized backpack from Osprey, and honestly, it was one of the best decisions I made. It kept me mobile, saved money on flights (no checked luggage fees), and made life on the road far easier — especially in tight hostel rooms and crowded buses.
Must-Have Packing Essentials for South America
Here’s what I wouldn’t travel without:
Layers Are Life
Packing for six months across multiple climates is a challenge — but it’s doable. The key is to pack light, layer smart, and choose versatile items you actually like wearing.
I traveled with a 40L carry-on-sized backpack from Osprey), and it was one of the best decisions I made. Not only did it save me money on flights, but it also made moving around so much easier.
Capsule Wardrobe
Build a wardrobe that mixes and matches easily. Think neutral colors, lightweight fabrics, and clothing that works across situations — from hikes to city cafés.
Packing Cubes = Sanity
These changed everything. Not only do they keep your bag organized, they make repacking in dorms or between night buses far less chaotic.
Comfortable Shoes
I brought three pairs — trail runners, lightweight sneakers, and Teva sandals. That was it.
Trail runners were great for hikes and travel days. Tevas were also perfect for most hikes, but also beach towns, showers, and the sneakers for days when my feet needed a break.
A Microfiber Towel
Compact, fast-drying, and doesn’t get that damp smell. Great for hostels, hot springs, and surprise beach days.
Cable Organizer Bag
Keeping your chargers, cords, and adapters in one place will save your sanity.
Lightweight Clothing
Think quick-dry materials, breathable fabrics, and things that can survive a rough hostel laundry cycle.
A Small Daypack
Essential for hikes, long walks, beach days, and carrying valuables on bus rides. For next time I'll bring one where water bottle goes outside and that can be attached to my backpack.
Final Thoughts on Packing for South America
Packing isn’t about preparing for every situation — it’s about being ready for most, and adaptable for the rest. If it turns out you forgot something, chances are you can buy it locally (and often cheaper). The goal is to stay mobile, stay comfortable, and keep things simple. You don’t need more stuff — you need the right stuff.
Step 4: Booking transport & accommodation
One of the most freeing things about backpacking in South America is how easy it is to book transport and accommodation as you go. Outside of peak holiday seasons or major events, you rarely need to plan weeks ahead. In fact, waiting until you're on the ground often gives you more options and better prices.
We booked almost every bus directly at the bus station — often just a day or two before departure. The only exception was Peru, where RedBus offered reliable, affordable online bookings. For accommodation, we used a mix of Booking.com, Airbnb, and Hostelworld, depending on the location and our needs.
Transport Tips for South America
Getting around the continent can be surprisingly smooth — but there are a few things worth knowing upfront:
Night Buses Can Save You Money
They’re long, but efficient. Traveling overnight means you save on accommodation, and many companies offer semi-cama or cama seats that actually let you sleep.
Use Rome2Rio for Research, Not Booking
Rome2Rio is great for getting a sense of how to travel between places — especially across borders. But don’t buy tickets through the platform; prices are often inflated.
Avoid Busbud
While it looks convenient, Busbud is often significantly more expensive than buying at the station. In most countries, including Bolivia, Argentina, and Brazil, it’s cheaper (and usually just as easy) to show up and buy in person — even for long distances.
Accommodation Tips That Actually Work
Where you stay shapes how you travel. We prioritized private rooms in hostels for comfort and cost balance — with occasional splurges when we needed a reset.
Here’s what worked best for us:
Booking.com for Hostels and Guesthouses
It offered the best range of affordable options, especially in smaller towns. We always filtered by rating and reviews before booking.
Airbnb for Longer City Stays
For stays of 5+ days, especially in cities like Buenos Aires or Medellín, Airbnb gave us more space, a kitchen, and a more local feel.
What about Hostelworld?
We only used Hostelworld once, mostly because the prices were slightly higher than on other platforms. But if I had been traveling solo, I probably would have used it more. Hostelworld properties tend to be more social — with events, communal areas, and organized activities that are great for meeting other travelers.
What we often did instead was use Hostelworld to scope out the best-located hostels in a new city, then search for alternatives in the same area on Booking.com, where we usually found lower prices for similar stays.
Final Thoughts on Booking on the Road
You don’t need to map out every ride and every room before you leave. Booking transport and accommodation on the go gives you flexibility, better prices, and room to follow unexpected opportunities.
The key is knowing where to book online (and where not to), and keeping your plans loose enough to adapt when things — inevitably — shift.
Step 5: Staying Safe & Sane
Traveling in South America is generally safe — but like anywhere, it helps to stay aware and trust your instincts.
We had two incidents of theft, but we also met countless kind, helpful people who went out of their way to make us feel welcome.
Safety Tips:
Blend in. Avoid flashy jewelry, big cameras, or anything that screams “tourist.”
Use crossbody bags with zippers. Bonus if it’s anti-theft (← affiliate link).
Keep backups. Store copies of your passport, cards, and travel insurance in the cloud.
Ask locals. Hostel staff, taxi drivers, and tour guides often give the best safety advice.
Trust your gut. If something feels off, it probably is.
Advice from other travellers can be great, but travelling as man can be different than be travelling as a women, as well as travelling five girls together can be different from travelling as a duo. Be critical from whom you receive advice.
Mental Health Tips:
Take rest days.
Find piece with the fact that you can’t do all even though you want to.
Journal your thoughts - I just used Notes in my iPhone.
Stay connected with people back home.
Delete pictures as you go - there will be sooo many.
Some bus trips were long. I sometimes used it to advance in Spanish.
Final Tips From the Road
This post gives you the big picture - the route, our rhythm, and the choices we made along the way. If you're dreaming of your own South America adventure, I’ve written more detailed guides for each country we visited, plus tips on budgeting, safety, and packing for a trip like this (scroll down for suggestions). I hope it helps you start sketching your own dream route — and maybe avoid a few of our rookie mistakes along the way. Here's some final tips:
Be flexible. Some of our best experiences weren’t planned and South America is the place to have a more loose plan.
Say yes. But not to everything.
Talk to other travellers, but also locals. Some of my best memories are with people we met along the way.
Don’t overplan. You’ll change your mind anyway.
Pin it for later!
Pin it, print it, or send it to your travel buddy who’s about to pack for their big trip!
Related posts for you
© 2025. All rights reserved.